Sunday, March 4, 2012
Rehab Project: Gee I'm Fancy
Meet Gee I'm Fancy, a.k.a. "GG." GG is an 11 year old quarter horse gelding (yes, he is a boy, even though he is called "GG!") In November of last year, I acquired him as a rehab project.
In his former career as a riding horse, GG was trained in various disciplines including dressage, hunter/jumper, and Western. He turns on a dime, knows piaffe and tempi changes, and was also used as a lesson horse. He was shod for many years in regular keg shoes, and was reasonably sound.
However, about 2 years ago GG started showing intermittent lameness in his left front foot. He was then shod in special wedge shoes designed to treat "navicular syndrome," a mysterious "disease" characterized by heel pain that most vets and farriers consider to be irreversible. This seemed to work for awhile, but the lameness returned, and eventually GG was given up as a lost cause.
His owner at the time, a not-for-profit youth and lesson program, pulled GG's shoes and decided to wait for the time when enough money came in to pay to "nerve" GG, meaning to severe the nerves that go to the back of the foot. This expensive, last-resort measure often needs to be redone in several years because the nerves grow back and the pain resumes. This is a photo of GG in his paddock before I adopted him:
In November 2011, I decided to adopt GG in an effort to try an alternative method to help him, that is, a barefoot, booted approach. This method attempts to correct soft-tissue changes in "navicular" feet. Many "navicular" horses have underdeveloped, weak structures in the back of the foot. When a horse is shod for many years without a break, the rigid shoe prevents the back part of the foot from flexing, which is how the cartilage in the back of the foot develops (sort of like using a muscle to make it stronger). When this occurs, the concussive forces of exercise can damage the blood vessels in that area, resulting in further degradation of the tissue and the vicious cycle continues.
Trimmers remove the shoes, provide more frequent trims, and use padded hoof boots to protect the weak foot so that it can flex again and begin to repair itself. Depending on the severity of the soft tissue deformation, the process of growing a new and better hoof, inside and out, can take a year or more. Some horses can go right back into work with hoof boots for riding, but GG has a significantly deformed hoof and so he is currently at a farm in Lincoln University, PA to "rest up." He is booted for turnout in his grassy paddock when the ground is hard, and barefoot when it is soft.
Here is a photo of GG in his big new field with his buddies! He was barefoot that day, and walking really well, since the ground was soft:
Below are before-and-after shots of the changes to GG's hooves. There is still a long way to go, but the results are promising so far! GG is generally pasture sound unless the ground is hard. His soles are very thin so he bruises easily, particularly on the left front, problem hoof. Because GG's walls have severely flared away from the sole, the hoof wall is made passive at every trim so that it can grow down straighter. As a result, he is walking on his soles. Boots (specifically Easyboot Rx's) are an essential way to protect his feet during the transition process.
The first photo is GG's left front hoof in November, 2011, right after he was adopted. He had already received several trims by me. His toe (which was about an inch too long) has been brought back, but otherwise not much flare has been removed. The image has been marked to compare with the "after" shot. On first glance, it doesn't look too bad:
When I saw the second image, taken on March 3, 2012, I was not very impressed with the changes. In fact, the hoof looks worse from this angle. It is clear that GG is having a tough time growing in a well-connected wall, as evidenced by the rings in this foot. He is currently on a low-starch diet and we are working on a supplement program to address this. However, there are subtle improvements to the hoof despite this challenge. The arch in the hairline has apparently relaxed a bit; also, and more importantly, there is heel material starting to fill in. This is shown much more clearly in the other photos, but you can still see it here:
So, clearly this hoof still has a long way to go. You probably noticed the significant arch in the quarters at ground level. The reason I have done this is because GG's main problem, besides his underdeveloped heel area, is that he has "quarter flares," or flares on the sides of his hooves. The "lateral" outside quarter flare was by far the worst. Aggressively working back these flares has been a major goal for his rehab.
A "flare" means that the hoof wall is tearing away from the bone inside, essentially a "mechanical founder." GG's wall is almost completely separated from the bone. Flared walls cannot bear the weight of the horse without ripping away further over time, so it is essential to make them non-weight bearing until the flare grows out, another reason why we use a barefoot approach, since a metal horseshoe puts all the horse's weight on the hoof wall.
No need to mark the following photo, the flare is huge. Also note the way the hairline makes a "ridge" at the top of the hoof wall, particularly on the "lateral" (righthand) side. This indicates that the bone inside the hoof has "sunk" down too low in the hoof capsule, a very serious problem (it's no wonder this foot hurts him!)
Now we can see why these photos are exciting to me! Below is the March 2012 photo. The flare is gone, the hairline is no longer showing that ridge, and the walls are considerably more balanced:
Excited with those photos, let's move onto the one that I am most excited about! As mentioned previously, we view "navicular syndrome" as having a lot to do with the fact that the soft tissue structures at the back of the foot are underdeveloped and weak. Our entire goal with a navicular horse, therefore, is to grow heel from the "inside out" that is, to build mass in the heel: not just a longer wall, but a more robust structure in its entirety. Of course, we also want external growth, but the main area I am looking to build with GG is frog material. GG came to me with paper-thin frogs, about 1/4 inch of skin covering blood (I know because once with my knife, doing what I thought was "routine frog cleanup," I saw pink meaning that I nearly drew blood, to my absolute horror. Luckily, I stopped in time and vowed never to take a knife to his frogs again!)
GG's before photo from November shows just what we are talking about: the area in the middle of the heel looks practically like goop propped up by his walls, and his frog is not touching the ground even though it is apparent that his heel walls are themselves too low. Also, note the severe imbalance that we saw from the front. GG really doesn't want to put any weight on the outer wall, where that significant flare is:
Now note the happy after-shot! Again, GG still has a ways to go with this hoof, but note how the whole heel area just looks thicker and more robust. Also note the wonderful new frog growth, reaching for the ground (when before it looked like it was hiding from it). Finally, notice how the hoof capsule is much more centered around the structures inside:
Finally, let's take a look at GG's soles. GG has very thin soles and tends to move "toe-first." Horses are supposed to walk like people do, with their heel hitting the ground first. The heel of the hoof is where all the shock-dissipating structures are.
Now you see GG's problem; since these structures are underdeveloped, landing "heel-first" would cause him to damage them. To protect himself, he lands "toe-first." The problem with this strategy is that the heel structures are developed through use. So, there is sort of a chicken-and-egg issue. Also, landing "toe-first" puts significant stress on structures that weren't designed to dissipate the shock, namely, tendons, ligaments, and bone. We believe that the classic "navicular changes" on the navicular bone, are the result of this vicious cycle, not the cause of it. When the horse lands "toe-first," the tendon along the back of the leg is tight on impact, causing greater friction on the navicular bone. Landing heel-first, the tendon is relaxed and there is less friction.
We break this cycle with the judicious use of padded hoof boots to help cushion the sensitive heel structures so the horse will hopefully feel comfortable enough to use his heels more. We also are very conservative with trimming down the heels.
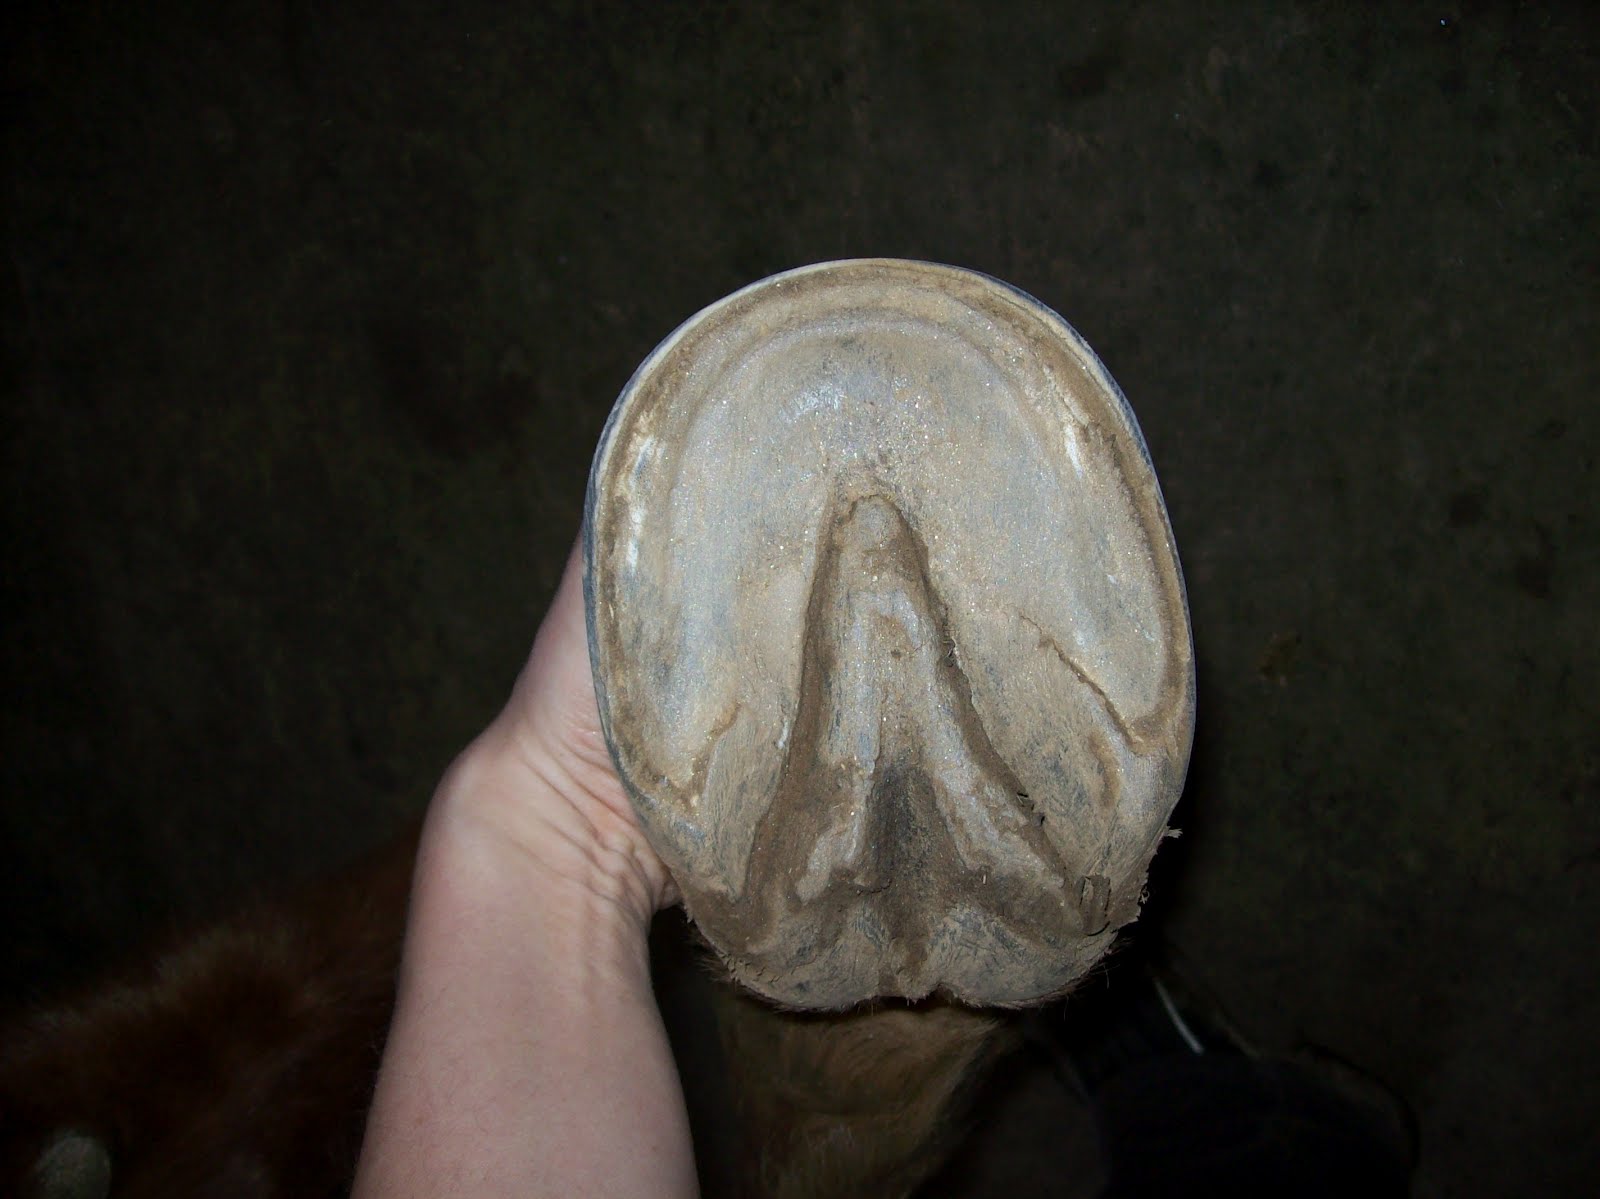
Ok, so here are GG's soles. The November photo has been marked to show the approximate place where the bone is inside the hoof, since it is a little difficult to see. You can then observe how deformed the lateral (righthand) side of the hoof is, how stretched away from the bone:
In the March photo, you can clearly see the ridge under which the coffin bone sits like a miniature "hoof" and that the rest of the hoof is more centered around it. A note about this ridge: GG has thin soles, and at first glance you might think that the bone is about to break through the sole! However, this ridge is rock-hard and there is no bruising present, indicating that is this not the bone pressing down but a protective callus. Since his toe wall is still flared forward, it doesn't provide the height necessary to protect the bone, so GG's sole is growing this ridge to protect the tip of the coffin bone from the constant abuse of landing on his toes. Because of this, it would be a cardinal sin to take a knife or rasp to this "toe callus on steroids." I let GG break over this callus and am very careful to make sure his hooves are protected on any hard or rocky ground.
Sunday, July 31, 2011
This is Fun!
Hi folks out there in internet land.
I've posted some pictures of one of my client horses. His name is Dakota. Dakota had 4 shoes pulled on March 27th, 2011. No photos were taken that day, and he was given a really minimal trim since he had just had a big change to his feet! When I came back out 6 weeks later, I took some photos of his hooves and the trim. Two trims later, on July 31st, I took another set of photos. Here are the comparisons of his left front foot on 5/8/11 and 7/31/11 (just under 3 months).
The first two lateral views, both post-trim, show how is foot has migrated back under his leg, and his toe and heel are shorter, all without removing any live sole. Also, you can get a sense for the new, post-shoe hoof growing in by noticing the very top of the rasp marks from the previous farrier (barely visible near the bottom of the hoof on 7/31/11). About 1 1/2 inches above the rasp marks is a growth ring marking about when we removed the shoes (about 1/2 way up the hoof wall). Notice how the new hoof is growing in at a taller angle than the previous hoof:
The next comparison shows how his heels have opened up and shortened, and his frog has become wider. I think his whole frog/heel region looks less "stressed" and stretched down between the contracted heels:
The sole views again show the decontracted, wider frog. Also notice in the after photos how the toe is less stretched forward, the "white line" (here filled with dirt) is more uniform in thickness, and the hoof is nice and round. The white chalkiness of the sole on the 7/31 photo is exfoliating sole, loose and soft, that I removed some of to balance his heels:
These are front views of the same hoof. The first one is pre-trim in May. Notice the poor quality of the hoof wall, that appears dry and dead. Now look at the new, strong, living hoof wall in the 7/31 photo. Next time I go trim Dakota, I will probably pay attention to the fact that the lateral (outside) wall on this hoof looks a little longer than the medial (inside) wall. This may just be his conformation, but I generally like to have the medial and lateral walls around the same length in a balanced hoof. If the live sole, however, doesn't allow for this I will always defer to that, because it grows directly from the bottom of the coffin bone:
The last two photos, while not great quality, are kind of my favorites. They really show how his heels have opened up and decontracted considerably in less than 3 months. Notice how the wall at the heels bends in in the 5/8 photo, and the frog is sending out "shoots" to reach for the ground. Imagine how it must feel to have all the internal structures of your heel smoosh between these pinched walls every time you load your hoof, with little ground support to stop the descent of the fetlock. The digital cushion can't serve it's function "cushioning" the bones of the hoof (including the navicular bone) without the positive pressure of the ground at peak impact.
Now look at the second photo, and how much more cone-like this hoof is shaped. The walls angle slightly out instead of in, so as the fetlock descends there is room for the digital cushion to expand and aid in support and circulation. Also note how the frog is just a millimeter or so above the ground, perfect for our soft Delaware Valley environment. Once Dakota moves out into grass, sand or dirt, he will have just the frog support he needs:
Dakota was sound from day one in the sand arena and grassy fields during this transition, and was ridden and jumped regularly, with the exception of an unrelated ligament injury in July. His owner refrained from riding on rocky trails since he was a little sensitive on them. Another option of course is booting for trail riding. I think this regular work was just as important as the trim in facilitating the transformation of his hooves. Horses were designed to move!
Saturday, June 18, 2011
Smiley Trim 6-18-11
Here are some before and after photos of Smiley, a mini I trim in Sewell, NJ. As you can see he has some issues! He is very base-narrow behind, with a big barrel, so he weights his lateral walls and has wall separation there. This has been invaded by white line disease, an infection of the inner hoof wall.
For several trims I was doing wall resections to try to heal the white line disease; however the lack of wall support on the outside of his leg has pushed his hooves in and created quite a flare on the medial side of both hooves, particularly the right hind. In this trim you can see how much flare was removed. It will be interesting to see if his hooves straighten out now that the medial flares have been reduced; post trim the medial walls were floating off the ground as you can see.
We have put Smiley on a shorter trim cycle to try and get his hooves back under him, and are also consulting with other hoof care professionals as to ways to minimize this problem in the future, while still treating the white line disease/separation. In the meantime, Smiley remains sound on both his weird hind hooves!
The above photo shows how the distortion effects the two hind hooves, and also how base-narrow his is.
The next two views show his base-narrow stance, pre- and post- trim. The following photos are before and after shots of his right hind hoof, the most distorted one.
Looking at the above photo and the fact that his medial wall was floating at the end, I am thinking of taking off more lateral (left) heel next time... to even out the weightbearing on the hoof. It would be helpful to have radiographs!
Wednesday, May 4, 2011
Long Toes in Hind Feet Cause Gluteal Pain

I've been thinking a lot about long toes lately, and especially about how long toes on hind feet can lead to hind end issues. There's an article out now that really sheds light on this issue! Read the article here.
Sunday, May 1, 2011
Case Study: Goose
Here are some photos of one of my client horses. Goose came to his owners with a bad case of central sulcus thrush and contracted heels. While we don't have photos of the condition of his feet then, you can see now how he no longer has a deep central sulcus, and his frogs have bulked up considerably. Goose suffered from infrequent "pasture trims" which allowed his toes and heels to grow forward. His heels raised his frogs off of the ground leading to atrophy of his digital cushion and contraction, and created the perfect breeding ground for thrush. During the pre purchase exam the veterinarian easily drew blood probing his frogs, showing how the thrush had eaten away the protective tissue so that only a thin layer of skin covered his frog corium.
Goose's new owners were committed to treating his thrush, and had the most success using the Grand Circuit product White Lighting. Once the infection was eliminated, Goose was ready to have his toes brought back and his heels lowered to begin the process of developing a strong, callused frog and digital cushion. Goose is now landing solidly heel-first at all gaits. Also note the before and after body shots, showing the effect of the trim on "opening up" his stance. When the hooves have grown forward the horse often stands "camped under" in order to place his hooves under his bony column and take the pressure off of the tendons and ligaments along the back of the leg.
Saturday, March 26, 2011
Tuesday, March 22, 2011
Cheat Sheet for Hoof Health
Three indicators of hoof health:
1. PLAY HOOF PEEK-A-BOO: With the hoof on the ground, cover everything but the top inch under the coronet with your hand. The top inch shows how the hoof wants to grow. Take your hand away. There should not be a surprise!
2. TAKE THE TOE TEST: On the bottom of a clean hoof, draw a line across the widest part of the foot (also where the bars terminate) and across the very back of the frog material. Draw a parallel line across the toe region. The lines at the toe and back of the frog should be about the same distance from the middle line.
3. ASSESS FROG FUNCTION: The frog should be one, tough unit, with a valley in the middle. DEEP CENTRAL CLEFT=DEEP THRUSH. Generally shedding should be minor; dramatic frog shedding can indicate that your horse’s callus is being eaten away by thrush, especially if the new frog underneath seems pale, sickly, or underdeveloped.
RED ALERT: Prominent growth rings, flared toes and growth rings that are farther apart at the heels than at the toe can be indications of laminitis.
Four things you can do to promote hoof health:
1. KEEP YOUR HORSE FIT NOT FAT! For many horses, this is not only the difference between healthy and unhealthy hooves, THIS IS LIFE AND DEATH. Feed the minimum amount to keep your horse’s weight, and exercise him as much as you and he can. DO make sure your horse is getting appropriate minerals; DO test your hay and balance to that (Balanced Equine Nutrition will formulate a supplement based on your hay sample: http://www.balancedequinenutrition.com/). Recommended products: California Trace, Grand Hoof, Focus Hoof. Avoid products with Iron, Manganese, and Potassium because these tend to be high in our area and block absorption of other minerals (Copper, Zinc and Selenium are usually deficient).
2. TREAT FOR THRUSH! If it warns you not to get it on your skin, DO NOT USE IT ON A THRUSH INFECTION, this is an infected wound on your horse’s foot and SENSITIVE. Product recommendations: White Lightning, CleanTrax, No Thrush, Thrush Off, Huuf Magic, Pete’s Goo, Silvetrasol, baby powder, Desitin as a preventative. Probe your horse’s frog every time you clean the foot, especially in the center, and remove any shedding material with scissors or a hoof knife. **NOTE: Thrush infections HURT, BE CAREFUL as your horse may react violently to deep probing of the central cleft. During muddy seasons weekly or anytime there is anything deep or black or smelly, treat with a natural topical as a preventative. Rotate products to avoid resistant bacteria.
3. MAINTAIN A SHORT SHOEING/TRIMMING CYCLE! Besides diet, the overwhelming cause of hoof deformity in domestic horses is overgrowth. This is even more important in shod horses because you are taking away the horse’s ability to wear his hooves himself, but some of the worst feet I have seen come from neglected barefoot horses out in wet, green pasture. Your horse’s genes are hardwired to think he is moving 20 miles a day over rough ground!
4. ENSURE ADEQUATE HOOF PROTECTION! Whether that is horseshoes, hoof boots, or thick soles, walls and frogs, don’t ask your horse to perform over terrain without suitable protection on his feet. Not only is this cruel and damaging to the internal structures, but improper movement perpetuates unhealthy hooves. For advice on what his hooves are capable of, check with your farrier, your trimmer… or your horse!
Subscribe to:
Posts (Atom)